The dinghy build is done!!!!!! It was a learning experience to say the least. I learned why you must do things. Why you must not do others and how you fix them when you did.
This post is about the dinghy build. Start to finish. I will give you a picture of the launch before I digress.
I started with one of these. I realized I would not fair well with an inflatable if I wanted to go oystering. I also could not sail it. So I sold it.
Bought some lumber.
Some books.
Plans to build this.
Built the table.
Added a shelf when I realized I needed a better place to store some of the hand tools I was buying.
Here is where I went wrong. I decided that this dinghy would be a better and cheaper way to go about learning to build a dinghy. Plans were $6.00 on line. Said it was simple. I figured I could learn about building a dinghy on this before building the more intricate and costly dinghy. WRONG!!! I spent as much on the materials for this one as the other would have cost. Old plans were incomplete (general lack of measurements). Nobody to call for answers. The $100 I spent on the better plans was negligible once the cost of materials was added up. I also made my biggest time costing error. This dinghy was planned as a conventional nail and screw build. I converted it over to stitch and glue. Not a good plan. Nothing worked out according to any kind of plan.
In essence... I took what may have been considered a simple build by looking at the plans and turned it into a thought provoking challenge. I enjoyed myself. Next time (and I highly recommend this) I will use modern plans and the building techniques recommended for that set of plans. Just saying!
First piece. The stern. I am now figuring out how to read a set of boat plans and transfer to wood. I took blueprint drawing in high school for two semesters. That was a long time ago and we never drew boats and learned about lofting. First learning curve. I was to find this to be one of several things I would end up learning. Did I mention how much I enjoyed this build???

The first side. I learned all about lofting here. First you must have a stick that bends easily. Is long enough to reach all the way from one end to the other. Yet..it must not be to wimpy. If it is your curve will be wrong. I could tell you how I know this but if you use your imagination it saves me some typing. The lines are drawn on the plywood. nails are put at end of your lines. Then your lofting stick is fastened at one end and bent along the nails. It gives you that gentle curve from nail to nail. Then you trace along the lofting stick. I also found the plans lacking for the correct height the sides should be. I really had to study and think on this. There also was no angle given for the stern and bow pieces. If I did not build it deep enough it may not hold any weight in the water before being submerged. What if the angle of the stern was wrong and using an outboard would not be possible? What if??What if??? Remember what I said about buying plans?
The bow piece.
So I now have all four sides cut out. I hope the angle on the ends of the sides were a good guess. I could find nothing to tell me and when the boards are bent around as you will see next... It changes things.
So I now realize the biggest difference between building on a frame and trying to make it a stitch and glue. With stitch and glue the bottom pieces are cut the right shape and then assembled. With frame construction, the sides are bent around a frame and then the bottom pieces are put on and trimmed to fit. I need a frame.
My frame.
Their idea.
Then I epoxied the corners. I was not sure what kind of pressures I would have when bowing the bottom pieces in place. But I needed what I had together already to stay together.
Time to see how the bottom goes on.
There are some steps to this part. The sheet of plywood is cut in half lengthwise. Fastened down with screws. I used drywall screws for clamping issues. Then once fastened the outline is traced around the edges. Taken back off. Cut out with a jigsaw and refastened. Then other side is done. No... You cannot use a whole sheet. I tried. It looks possible until you get it fastened and see the bulges where it cannot bend.
Whew!!! That was interesting. You can see the block of wood under the bow piece that is screwed to the table and bow is screwed to it.
More of bracing on stern. If you look closely. You can see how my framework was screwed to the table along the sides.
Better picture of my frame.
Since it is going to be a stitch and glue build. The bottom pieces now come back off. Then are tied with wire. Wire is tied loose enough that a pencil fits in the loop. Gives it room to unfold.
Unfolded and fastening down.
From the minute I started to build this dinghy different than the plans called for it was a barrage of little design flaws that needed much thought and then careful application of ideas in order not to ruin material and have to start over. I was also just weening myself off pain meds as this was happening. It was interesting.
Because I was building this around a frame I was not sure how close to use the tie wire. I was able to drill the holes much further apart on the other side. Less holes, less wire. Other side went faster.
Eventually all pieces were fastened.
Next was to flip it over and start putting a bead of epoxy thickened with cabosil in the corners.
Epoxy is in between wires. Wires then come out and final bead of epoxy will be fared out.
Then it is time to fiberglass all outside edges.
All done. Installing the keel comes next. Not much how in the plans. I have been looking at other plans and reading books for ideas on how to do some things. What I find is the recommendation for more than one person being needed to install the keel. I want to do it now. I have nobody available to help. I opt for doing it alone. I just have to figure out how to hold it where it needs to be so I can go underneath and run the screws in. It will also be epoxied. Hmmmm... This did cause me some thought, delays and some learning how to repair a crooked keel. But I did not know all that yet. I was determined to keep moving forward.

It is installed. I had pre-drilled the holes. 5 of them. used a chisel to -V- the edge that fastened to the center line and put on my epoxy. As screws were set to go in pre-drilled holes. I thought all good. I reached around and let her rip. All screws in and in about 8 hours I can move on. RIGHT!!!! In 8 hours I found a bend in the keel and learned a good lesson. Get help next time or figure out a better way. What happened? As the screws tightened down with the epoxy there, some of them did not follow the path of least resistance as I had planned. Rather they didn't follow the holes. Crap!!!! Well.....I can fix it. Was not that simple but I did fix it and I have an insanely strong and straight keel on it now. I figured out how to install a keel by myself when I installed the keel forward of the centerboard box. I spent much time prefitting. Only used 2 screws. One on each end. I snugged it up tight and checked it for straight. THEN I mixed the epoxy. It went on as planned.


Not easy to see but it had a bend and part of it leaned. I used epoxy mixed with cabosil to fare it out and then fiber glassed it. It was time consuming but it turned out well.
 |
| This board down the center is the keelson. If I had built on a frame, it would already have been in place. The bottom was wimpy and the support was needed before the keel could go on. It bows the bottom out so has to be longer than the bottom measures at this point. Also had to open up a slot under stern and bow pieces to allow it to slide in. Otherwise...What would hold it in place once bowed in? I had to do this with the bilge battens later. But not yet. | Add caption |
Centerboard box already mentioned is assembled. Hole cut in bottom of dinghy and box installed.
Here is forward keel being fit.
Better picture of fiber glassing. Piece of fiber glass tape used.
More pictures of plans.
Picture of centerboard box. Started using microspheres mixed in epoxy to fare out the rough corners. In moving the dinghy around... I found myself dissatisfied with the stiffness, or lack of, in the bottom. It was going to need the bilge battens.
Bilge battens went in the same as keelson. Epoxy under them also. Then seat risers while I was there. Epoxied and screwed. Once again. No clear cut measurement in the plans for the height of seat risers. I chose to install at the level of the centerboard.
Upside down picture. No real information. Great plans.
Time for the gun'ls or rub rails, whatever terminology works for you. These are the spacer blocks I will be using. Show you in a minute.
Routered edges for gun'ls
Glued spacers in place.
Strip on inside. Clamps,glue and screws. Each hole drilled and countersunk so I would have no splitting wood causing me to start over. I started in the center and worked towards the ends. 22 spacer blocks per side.
It was time consuming.
Finally...Looks to be fastened well?? Not yet.
Faring it out while I figure out next step.
I decide bottom can have paint. I figure out where the topside and bottom paint will meet shall and mask it off.
Now it is starting to look like I am getting somewhere. Lots left...but I can see the end of this build in sight.
I decide I have to put knees in the top corners. I will show you in a minute. It was about a 3 mile ride or so each way to lowes so I could get the boards I needed. A 2x6 and a 1x8 cut into 2 ft pieces. I sure like that bike rack.
First one in. Cannot cut any of the four the same. All must be cut as close as possible and sanded until they are fairly tight. Lots of angles.
Those four blocks of wood ended up taking about 5 hours. But by the time they were epoxied and screwed in this boat is getting pretty stout.
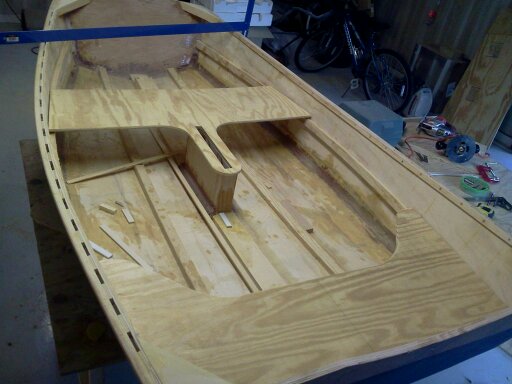
Stern seat is looking good. I cut out both seats. Built the framework under them, then routered the leading edges top and bottom. Plywood has a tendency to split if a shoe or something catches the edge.
All seat frame work is screwed and epoxied where appropriate. Time for some primer.
Joints with curing epoxy are all left to prime later. Blocks on floor are for support under only false floor on boat.
Getting closer. About time to get serious about paint.
The tan in the bottom made a good contrast. I need to finish a few things.
Floor board is painted tan and installed.
Handles were all lowes had. Good enough for now.
The launch in Mary Beth's pool.
Vivians maiden voyage in a dinghy. I am holding outboard to check how dinghy sits in the water with everything on board. With the outboard in my lap, I am about 270 pounds. I thing the outboard is to heavy ;-)
What have I learned??? I want a bigger dinghy for sure. Use the good plans and build what you want the first time. This is my first real hobby type project since getting hurt in 2006, I had fun. Truthfully....There is no cheap dinghy build just to try it out. They will all be similar in cost. The cost of good plans are such a negligible amount that cheap plans are no real savings.
Maybe if you had the wood laying around it might be worth it. But if you have to buy every stick. Buy good plans. Cost to build this dinghy?? I didn't write everything down as I was buying tools and the materials to build the work table. I would guess between $700 and $900. Maybe not that much. Maybe more The epoxy and paint was an easy $300. Lots of screws. Couple hundred stainless screws. Handles. Bolts for those. Plywood and boards. $800 may really do it.
Vivian is going to help me build the nester dinghy that comes next.
Good chance for us to do something together and also learn the same terminology. The dinghy build was fun. I knew I had some things to learn along the way and in the end... I like the dinghy and think I have found a new hobby. Just goes to show you. If you are determined enough, you do not really need a good plan.
Certainly not to build a working dinghy.